Installing Kubuntu Desktop in VirtualBox on Windows
A hands-on introduction to running Linux inside Windows — and your first steps in Kubuntu
This document explains how to install Kubuntu Desktop inside an Oracle VirtualBox virtual machine on a Windows 10/11 computer. It begins with an overview of the GNU/Linux philosophy — what the GNU tools are, what the Linux kernel does, and how distributions such as Kubuntu assemble them into a complete system. It then covers creating and configuring the virtual machine, installing Kubuntu, installing the VirtualBox Guest Additions, and taking your first steps in the Kubuntu Linux desktop: navigating Plasma, managing files with Dolphin, working in the Konsole terminal, and keeping the system up to date. It finishes by showing how to build a complete data science toolchain on top of Kubuntu: R, RStudio, the Quarto CLI, the Positron IDE, and the main Python libraries for data science, including GeoPandas and scikit-learn. It closes by installing the tools used to put models into production: Docker for containers, and the FastAPI and plumber frameworks for serving models as web APIs in Python and R.
Introduction
Oracle VirtualBox is a program that runs a complete computer — a virtual machine — inside a window on your Windows desktop. In this guide we will use it to install Kubuntu, a friendly GNU/Linux distribution, and then turn that installation into a complete data science workstation. Nothing on your Windows computer is replaced or modified: the virtual machine lives inside a single window (and a single file on disk), so you can experiment freely and safely.
The document is organised into the following sections:
- Installing VirtualBox — the software that runs virtual machines on Windows.
- GNU/Linux and Kubuntu — the philosophy and history behind the system you are about to install, and where Kubuntu fits in.
- Create the Virtual Machine — defining the virtual hardware.
- Install Kubuntu — starting the machine and running the installer.
- Post-Installation Setup — updates, Guest Additions, clipboard sharing, snapshots and shutdown.
- First Steps in Kubuntu — the Plasma desktop, Dolphin and the Konsole terminal.
- Installing the Data Science Toolchain — R, RStudio, Quarto, Positron and Python.
- Installing Docker and API Tools — Docker for containers, and the FastAPI and plumber frameworks for serving models as web APIs.
After completing this exercise you will be able to:
- Explain what GNU/Linux is: the GNU tools, the Linux kernel, and how a distribution such as Kubuntu combines them.
- Create and configure a virtual machine in VirtualBox.
- Install Kubuntu Desktop from an ISO installation image.
- Update the system and install software from the command line.
- Navigate the KDE Plasma desktop and perform everyday tasks in Linux.
- Install a complete data science stack: R, RStudio, Quarto, Positron and the main Python data science libraries.
- Install the deployment tooling: Docker for containers, plus the FastAPI and plumber frameworks for building web APIs.
What You Need
Before starting, make sure you have:
1 Installing VirtualBox
1.1 What is a virtual machine?
VirtualBox allows you to run another operating system inside Windows without replacing or modifying your normal Windows installation. The operating system that runs inside VirtualBox is called a guest; your normal Windows installation is the host. Everything the guest does happens inside a single window (or a file on disk), so you can experiment freely and safely.
1.2 Download and install
- Open a web browser and go to the official VirtualBox website: https://www.virtualbox.org/
- Select Downloads.
- Download VirtualBox for Windows hosts.
- Open the downloaded installer and follow the installation wizard.
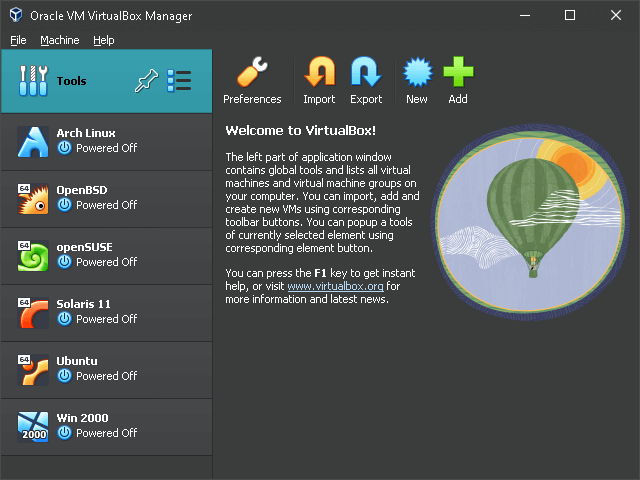
The default installation options are normally suitable. If Windows asks for permission to install network or device drivers, accept them. When the installation is complete, start Oracle VirtualBox. Figure 1 shows the VirtualBox manager window you should see.
Your network connection may briefly disconnect while VirtualBox installs its virtual network drivers. This is normal.
2 GNU/Linux and Kubuntu
Before downloading anything, it is worth understanding what you are about to install. Kubuntu is not a single program but a distribution: a complete operating system assembled from two main ingredients — the GNU tools and the Linux kernel — plus a desktop environment and thousands of applications. The story of how those pieces came together, in the proper order, explains both how your new system works and why it is free.
2.1 The philosophy of GNU/Linux
When people say “Linux”, they usually mean a complete operating system that competes with Windows or macOS. Strictly speaking, however, Linux is only the name of the kernel — one program among thousands. The complete system is the result of two separate projects, GNU and Linux, that were built to fit together.
2.1.1 From Unix to free software
Both projects inherit from Unix, the operating system developed at Bell Labs in the 1970s. Unix established the design that still shapes every Linux system today: an operating system made of many small programs that each do one thing well, combined through a common interface — the command line — to solve bigger tasks. Unix was extremely successful, but by the early 1980s it had become commercial software: universities and companies could use it, but they could no longer study how it worked, share it, or improve it.
2.1.2 1983: the GNU Project and its tools
In September 1983, Richard Stallman announced the GNU Project (“GNU’s Not Unix”) with an ambitious goal: to build a complete operating system that anyone could run, study, modify and share — free software. Here “free” refers to freedom, not price: the four essential freedoms are to run the program for any purpose, to study how it works, to modify it, and to redistribute it (original or modified) to anyone.
To protect these freedoms legally, the project wrote the GNU General Public License (GPL), the first copyleft licence: everyone is free to use, study and change the software, but anyone who redistributes it must pass those same freedoms on to others.
Through the 1980s, GNU developers wrote most of the pieces of a Unix-like system — the userland: the set of tools and utilities that people and programs actually interact with. The GNU tools include:
- GCC (GNU Compiler Collection) — the compilers that translate C, C++ and other languages into machine code;
- Bash — the shell, the command interpreter that reads what you type in a terminal;
- coreutils — the everyday file and text utilities:
ls,cp,mv,rm,cat,dateand many more; - glibc — the standard C library that virtually every program relies on;
- and utilities such as
make,grep,sed,tarand the Emacs editor.
By 1991 the GNU system was almost complete — compilers, shell, utilities, libraries — but one essential piece was still missing: a working kernel.
2.1.3 1991: the Linux kernel
The kernel is the core program of any operating system. It manages the hardware — processor, memory, disks, network — and decides which programs run and for how long. Every other program, including all the GNU tools, asks the kernel to act on its behalf: reading a file, allocating memory, sending a network packet. The GNU Project had its own kernel under development (the Hurd), but it was not yet usable.
In 1991, a computer science student in Finland, Linus Torvalds, wrote a new Unix-like kernel as a hobby project and released it on the Internet under the name Linux. In 1992 he re-licensed it under the GNU GPL, making it permanently free software. It filled exactly the gap in the GNU system: GNU provided the tools, and Linux the missing kernel.
2.1.4 GNU + Linux: one complete system
Combining the two produced, for the first time, a complete, free, working operating system:
| Layer | What it does | In Kubuntu |
|---|---|---|
| Kernel (Linux) | Talks to the hardware; manages memory, processes, devices | Linux |
| Tools (GNU userland) | Shell, utilities, compilers and libraries | Bash, coreutils, GCC, glibc |
| Desktop environment | The graphical interface | KDE Plasma |
| Distribution | Kernel + tools + desktop, packaged for easy installation | Kubuntu (Ubuntu base) |
When you type ls -la in Kubuntu’s Konsole terminal, Bash (a GNU tool) interprets the command, coreutils (a GNU tool) formats the listing, and the Linux kernel performs the actual disk reads. The kernel works invisibly beneath the tools — which is why the GNU Project asks people to call the whole system GNU/Linux, and why that name is the most accurate one.
The free software philosophy has very practical consequences that you will use throughout this course: you can download Kubuntu without paying, install it on as many machines as you like, obtain thousands of programs from public repositories with a single command (apt install ...), and read — or even modify — the source code of every component if you are curious.
2.1.5 Distributions: from Debian to Kubuntu
Because the GPL allows anyone to copy and redistribute, communities assemble the kernel, the GNU tools, a desktop, a package manager and an installer into complete, ready-to-use systems called distributions — Debian, Fedora, openSUSE and others. In 2004, Canonical launched Ubuntu, a Debian-based distribution focused on ease of use, and Kubuntu is the official Ubuntu flavour that replaces Ubuntu’s default desktop with KDE Plasma.
2.2 What is Kubuntu?
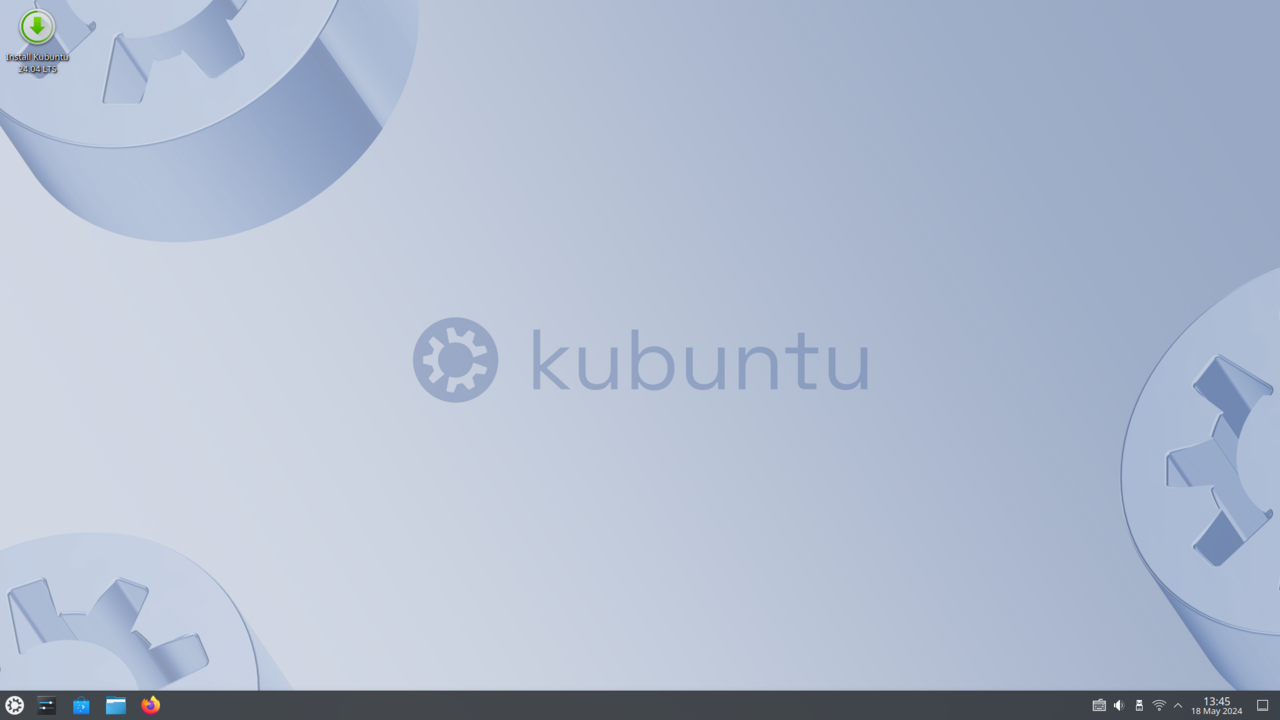
Kubuntu shares its foundation with Ubuntu — the same repositories, the same packages, the same release schedule — but uses the KDE Plasma desktop, which has a layout that many Windows users find familiar: a taskbar at the bottom, an application menu at the bottom-left, and system icons at the bottom-right (see Figure 2).
2.3 Download Kubuntu Desktop
- Go to the official Kubuntu website: https://kubuntu.org/getkubuntu/
- Download the latest Kubuntu Desktop LTS version if available.
- Save the
.isofile somewhere easy to find, such as yourDownloadsfolder.
The ISO file works like a virtual installation DVD: the virtual machine will “boot” from it exactly as a physical computer boots from a DVD or USB stick.
3 Create a Virtual Machine
- Open VirtualBox and select New.
- Enter the following information:
- Name:
Kubuntu - Type: Linux
- Version: Ubuntu (64-bit)
- Name:
- Select the Kubuntu ISO file when VirtualBox asks for an installation image.
3.1 Recommended hardware
Assign approximately:
| Component | Recommended | Notes |
|---|---|---|
| RAM | 4 GB / 4096 MB | Windows still needs memory to run |
| Processors | 2 CPUs | Leave at least half for the host |
| Virtual disk | 25–30 GB | Dynamically allocated is fine |
Do not assign all of your computer’s memory or processors to the virtual machine. Windows still needs resources to operate.
Finally, create the virtual machine.
4 Install Kubuntu
In this section we start the virtual machine for the first time and run the Kubuntu installer.
4.1 Start the virtual machine
- Select the new Kubuntu virtual machine and click Start.
- Kubuntu will start from the ISO file.
- After a short time, you should see the Kubuntu welcome screen.
- Choose Try or Install Kubuntu, then start the installer.
4.2 The installation wizard
The Kubuntu installation wizard will guide you through the setup.
4.2.1 Language and keyboard
- Language. Choose your preferred language and continue.
- Keyboard. Select the correct keyboard layout. Examples include:
- English (US)
- English (UK)
- Spanish
4.2.2 Network
If the virtual machine has Internet access, you can connect during installation. This is recommended: the installer can download updates and language packs as it installs.
4.2.3 Installation options
Choose the normal or full installation option if available. You may also be asked whether you want to install third-party software or multimedia codecs. For a beginner setup, enabling these options is usually useful.
4.2.4 Disk setup
Choose the option that installs Kubuntu using the entire virtual disk. The wording may be similar to:
Erase disk and install Kubuntu
This only affects the virtual hard disk created for the virtual machine. It does not erase your Windows installation.
Continue with the installation.
4.2.5 User account
Enter:
- Your name
- A computer name
- A username
- A password
Remember the password: you will need it when installing software or changing system settings.
When the installation is complete, restart the virtual machine. If Kubuntu asks you to remove the installation medium, press Enter — VirtualBox will usually disconnect the ISO automatically.
5 Post-Installation Setup
Kubuntu is now installed. This section covers the essential configuration steps — updating the system, installing the VirtualBox Guest Additions, and learning a few habits (snapshots, clean shutdowns) that keep the machine healthy.
5.1 Update Kubuntu
After logging in for the first time, it is recommended to install the latest updates. Open the Konsole terminal from the application menu and enter:
sudo apt updatePress Enter and type your password when requested. Then enter:
sudo apt upgrade -yThis downloads and installs available system updates.
sudo runs a command with administrator privileges. Linux asks for your password rather than showing a dialog like Windows’ User Account Control — the purpose is the same: confirming that you really want to make system-wide changes.
5.2 Install the VirtualBox Guest Additions
VirtualBox Guest Additions are additional tools installed inside the Kubuntu virtual machine. They provide useful features such as:
- Better screen resolutions
- Automatic window resizing
- Improved mouse integration
- Shared clipboard support
- Better graphics support
- Shared folders between Windows and Linux
5.2.1 Step 1: Install the required packages
Open Konsole and enter:
sudo apt update
sudo apt install build-essential dkms linux-headers-$(uname -r)
Press Enter and confirm the installation if required.
5.2.2 Step 2: Insert the Guest Additions CD
From the VirtualBox window menu, select:
Devices → Insert Guest Additions CD Image
Kubuntu should detect the virtual CD. Open it using the file manager. You should see a file similar to VBoxLinuxAdditions.run.
5.2.3 Step 3: Install Guest Additions
Open a terminal in the Guest Additions CD directory and run:
sudo ./VBoxLinuxAdditions.runWait until the installation finishes, then restart Kubuntu:
sudo rebootAfter restarting, VirtualBox should automatically resize the Kubuntu desktop when you resize the VirtualBox window.
5.5 Taking a snapshot
A snapshot saves the current state of the virtual machine. This is useful before exercises or system changes because you can return to a working configuration if something goes wrong.
In VirtualBox:
- Select the virtual machine.
- Open the Snapshots section.
- Select Take Snapshot and give it a name such as
Clean Kubuntu Installation.
You can later restore this snapshot if necessary.
5.6 Shutting down the virtual machine
Whenever possible, shut Kubuntu down normally. Inside Kubuntu, open the application menu and select:
Leave → Shut Down
Avoid simply powering off the VirtualBox window: this is similar to disconnecting the power from a physical computer and can corrupt files.
6 First Steps in Kubuntu
Now that Kubuntu is installed, let’s take a tour of your new operating system. If you have used Windows before, most concepts will feel familiar — only the names change.
6.1 Logging in and the Plasma desktop
After booting, Kubuntu shows a login screen where you type the password you created during installation. You then land on the KDE Plasma desktop (Figure 2).
The main areas of the screen are:
| Area | Location | Equivalent in Windows |
|---|---|---|
| Application launcher | Bottom-left corner | Start menu |
| Task manager | Bottom edge | Taskbar |
| System tray | Bottom-right corner | System tray / clock area |
| Panel | The whole bottom bar | Taskbar |
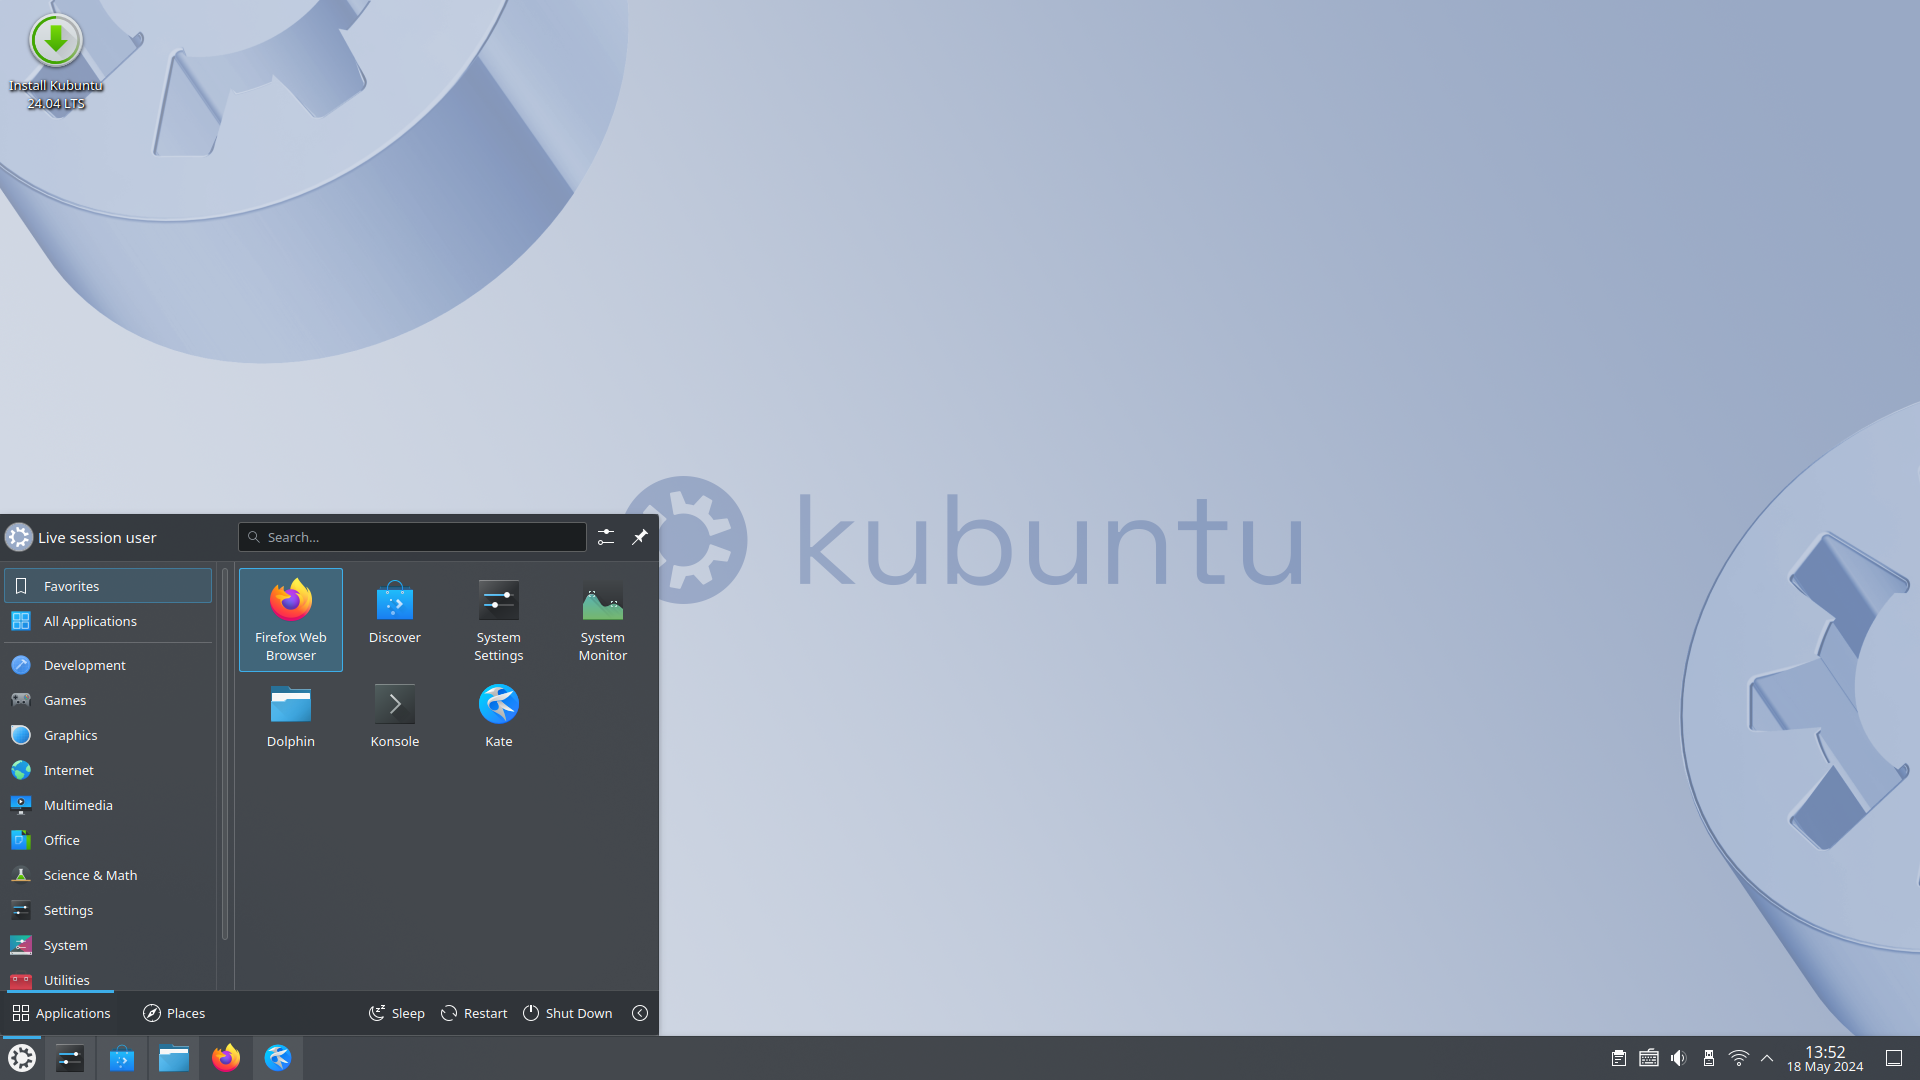
Click the launcher icon (the K gear at the bottom-left) to open the application menu, shown in Figure 3. You can browse application categories on the left or simply start typing the name of a program to search for it — exactly like pressing the Windows key and typing.
Keyboard shortcut: press Meta (the Windows key) to open the application launcher from anywhere, just like in Windows.
6.2 Browsing files with Dolphin
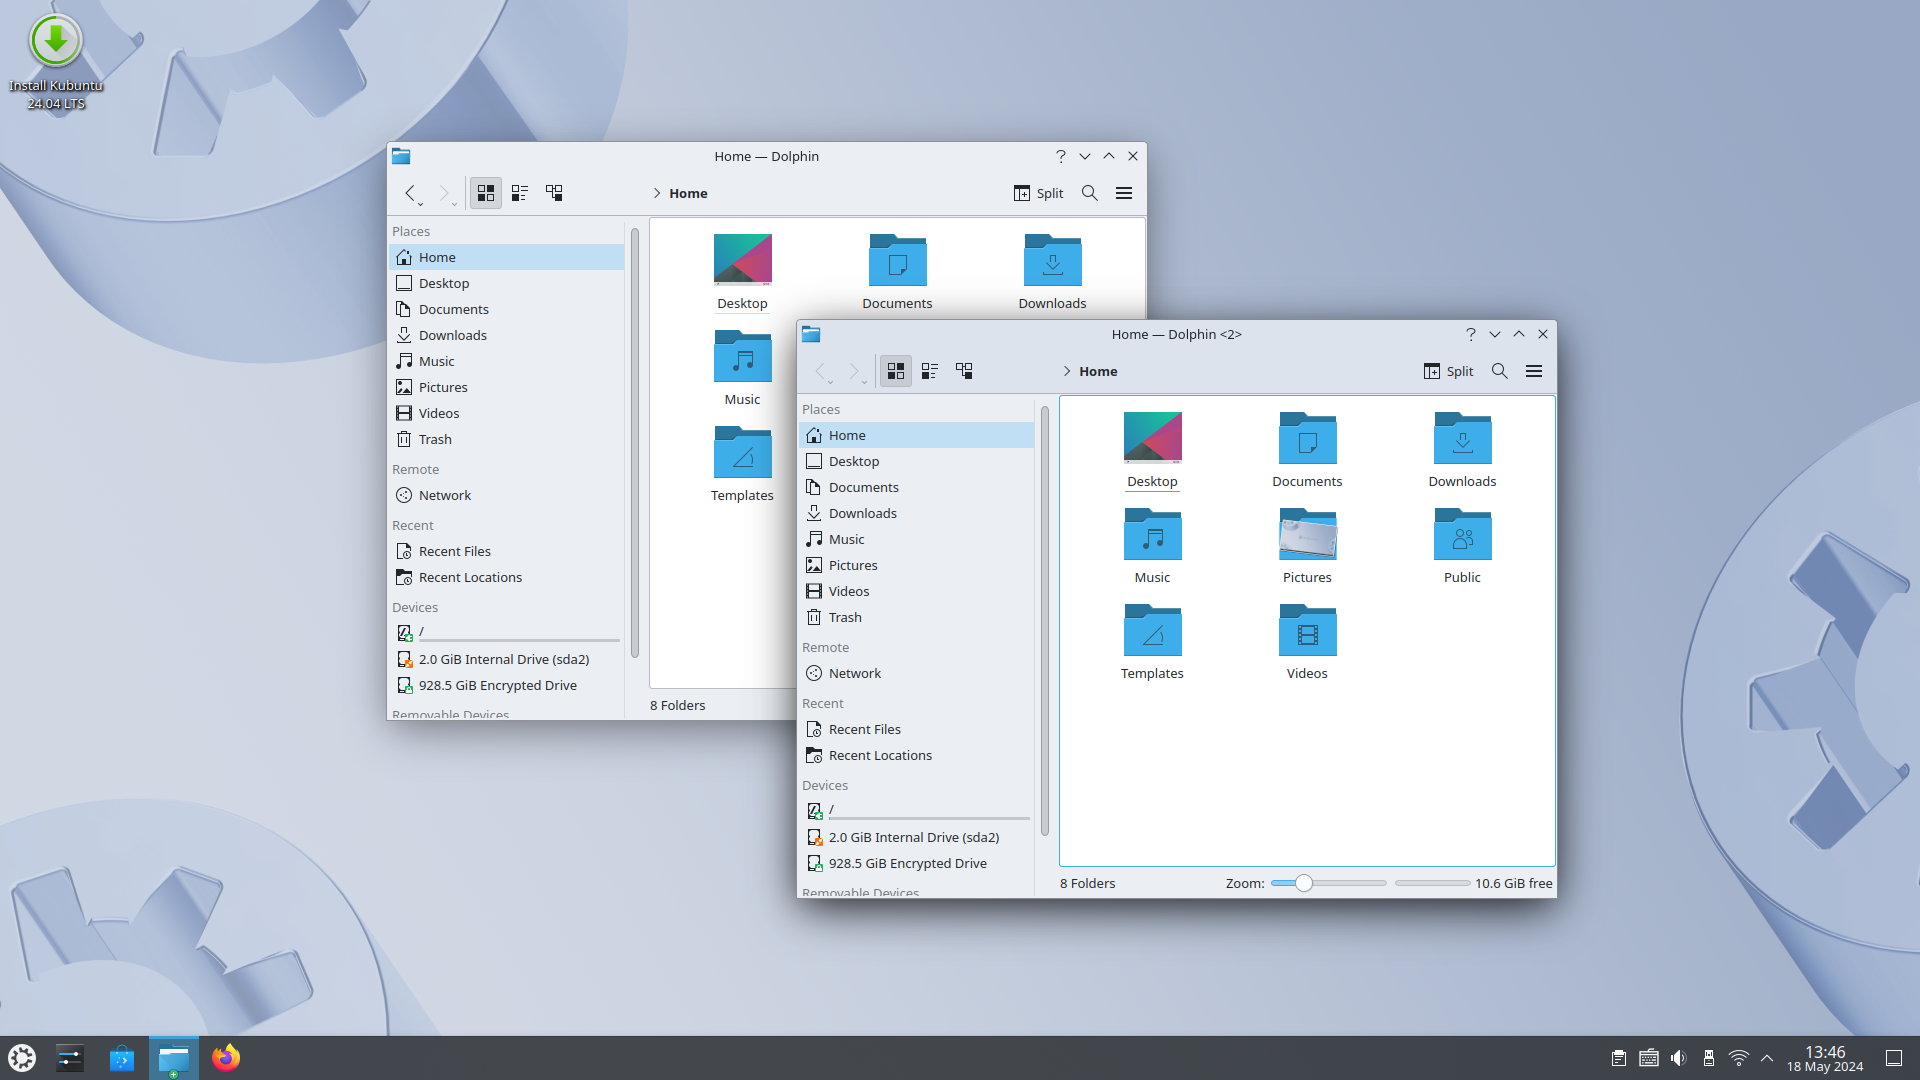
Dolphin is the KDE file manager, the equivalent of Windows’ File Explorer. Open it from the application menu (search for “Dolphin” or look in the System category) or by clicking the folder icon in the panel.
Figure 4 shows Dolphin with its main parts: a sidebar with Places (Home, Documents, Downloads, …), a path bar at the top, and the file area.
A few differences worth knowing from day one:
- Your personal files live in
/home/yourname, usually called just~(“home”). This is the equivalent ofC:\Users\yournamein Windows. - Linux uses a single directory tree rooted at
/— there is noC:drive. USB sticks and other disks appear under/media/yourname/.... - File names are case-sensitive:
Report.txtandreport.txtare two different files. - Hidden files start with a dot (
.config). Toggle their visibility withCtrl+.in Dolphin.
6.3 Working with the Konsole terminal
The Konsole terminal is where you will do most of your work in this course. Open it from the application menu (search “Konsole”) or with the shortcut Ctrl+Alt+T.
A few essential commands to get around:
pwd                 # print working directory: where am I?
ls                  # list files in the current directory
ls -la              # ...including hidden files, with details
cd Downloads        # go to ~/Downloads
cd ..               # go up one directory
cd ~                # go to your home directory
mkdir projects      # create a directory
cp report.txt ~/Documents/
mv report.txt final-report.txt
rm old-file.txt # delete a file (careful: no trash bin!)Unlike Windows, Linux command options are written with a dash (ls -la), and file paths use forward slashes (/home/alex) instead of backslashes. Press Tab to auto-complete names — it saves an enormous amount of typing.
Useful shortcuts:
Ctrl+Alt+T— open a terminal anywhereCtrl+Shift+T— open a new tab in KonsoleCtrl+L— clear the terminalCtrl+C— cancel the running command- Up/Down arrows — navigate the command history
6.4 Keeping the system up to date
Kubuntu can update itself graphically with Discover, the software centre, which appears in the panel when updates are available. However, the fastest and most reliable way is the terminal, using APT (Advanced Packaging Tool):
sudo apt update          # refresh the list of available updates
sudo apt upgrade -y      # install them
To install a program by name:
sudo apt install <package-name>For example, to install the curl download tool and the nano text editor:
sudo apt install curl nanoYou do not need to download installers from websites as in Windows. Almost everything you need is in the repositories, central servers curated by Ubuntu and KDE, and APT installs the version that matches your system — the free software model of Section 2.1 in practice.
6.5 Exploring settings
The System Settings application (search for “Settings” in the launcher) is the KDE equivalent of the Windows Settings app. There you can change the wallpaper, connect to Wi-Fi networks, add users, configure the keyboard and much more. It is divided into groups such as Workspace, Personalization and System, just like the categories in Windows.
If you get lost in a new system, remember the two lifelines you already know: search from the application launcher (like the Windows Start menu) and search the web for “Kubuntu how to …”. The Kubuntu and KDE documentation at https://docs.kde.org is excellent.
7 Installing the Data Science Toolchain
With Kubuntu up and running, we can turn it into a complete data science workstation. In this chapter we install, in order:
- R and RStudio — statistical computing and its classic IDE.
- Quarto — the publishing system used to produce this very document.
- Positron — Posit’s next-generation IDE for R and Python.
- Python and the main data science libraries, including GeoPandas and scikit-learn.
Wherever possible we install from the Ubuntu repositories with apt, because packages installed this way receive automatic security updates through the normal system update process. For software that Ubuntu does not package (RStudio, Quarto, Positron) or that we need in a more recent version than Ubuntu ships (R and Python libraries), we use the official vendor repositories, .deb packages or pip.
Before starting, take a snapshot of the virtual machine (see Section 5.5): if anything goes wrong you can return to a clean state in seconds.
7.1 R
7.1.1 Why not apt install r-base?
Ubuntu’s repositories do include R, but the r-base package is often an older point release. For data science work we want the current R, so the recommended approach is to register CRAN’s Ubuntu repository (known as Posit Package Manager, packagemanager.posit.co) and install from there.
7.1.2 Add the CRAN repository key
# Install the helper tools used to manage repository keys
sudo apt install --no-install-recommends software-properties-common dirmngr

# Download and install the signing key used by CRAN/Posit
wget -qO- https://cloud.r-project.org/bin/linux/ubuntu/marutter_pubkey.asc \
  | gpg --dearmor \
  | sudo tee /etc/apt/trusted.gpg.d/cran.gpg > /dev/null
7.1.3 Add the repository and install R
The example below targets the LTS release codenamed noble (Ubuntu 24.04). Check https://cloud.r-project.org/bin/linux/ubuntu/ for the codename that matches your Kubuntu version.
# Register the CRAN repository for your Ubuntu release
echo "deb https://cloud.r-project.org/bin/linux/ubuntu noble-cran40/" \
  | sudo tee /etc/apt/sources.list.d/cran-r.list

sudo apt update
sudo apt install --no-install-recommends r-base r-base-dev
Verify the installation:
R --version7.1.4 Useful R packages
R itself is a small core; its power comes from packages. Two essentials for reproducible work are rmarkdown (which installs Quarto-aware helpers) and tidyverse (data manipulation and ggplot2 plotting):
install.packages(c("rmarkdown", "tidyverse", "data.table"))Install R packages from inside R (as above) or from RStudio, not with apt. R packages installed with apt (the r-cran-* packages) are handy for system libraries but are older and incomplete compared to CRAN.
7.2 RStudio Desktop
RStudio Desktop is not in the Ubuntu repositories, but Posit provides a .deb package that installs cleanly on Kubuntu.
Go to https://posit.co/download/rstudio-desktop/ and download the Ubuntu 22/24/26 (amd64) installer, or fetch it directly from Konsole:
wget https://download1.rstudio.org/electron/jammy/amd64/rstudio-2026.09.0-174-amd64.debWarningThe URL above points to a specific version. Check the download page for the current release number and adjust the filename accordingly.
Install the package —
aptresolves and installs the required dependencies automatically:sudo apt install ./rstudio-2026.09.0-174-amd64.debLaunch RStudio from the application menu and confirm it starts with the R version installed in Section 7.1.
If sudo apt install ./file.deb reports unmet dependencies, run sudo apt update and retry; apt will fetch them from the repositories.
7.3 Quarto
Quarto is the open publishing system this document is written in: it renders .qmd files to HTML, PDF, Word, slides and more, and works with R, Python and Julia. While the rmarkdown R package installs an internal bundled copy, for command-line and IDE use we install the Quarto CLI standalone.
Two options:
7.3.1 Option A: install the .deb from Posit Package Manager
Posit Package Manager serves a .deb repository for Quarto, so apt keeps it up to date with the rest of the system:
wget "https://posit.co/download/quarto-${QUARTO_VERSION}-linux-amd64.deb"Alternatively, download the current release from https://quarto.org/docs/download/, then:
sudo apt install ./quarto-*-linux-amd64.deb7.3.2 Option B: one-line installer
The fastest route is the official install script:
wget https://github.com/quarto-dev/quarto-cli/releases/latest/download/quarto-linux-amd64.deb
sudo apt install ./quarto-linux-amd64.deb
Verify the installation:
quarto --version
quarto checkquarto check verifies that Quarto can find R, Python and the Jupyter engine — an excellent smoke test once RStudio, Positron and Python are installed.
7.4 Positron
Positron is Posit’s next-generation, open-source data science IDE for both R and Python, built on VS Code’s foundation but designed around notebooks, data explorers and Posit’s tooling. It is not yet in the Ubuntu repositories, so we install Posit’s official .deb.
Download the Debian/Ubuntu x64 installer from https://positron.posit.co/download.html, or from Konsole:
wget https://cdn.posit.co/positron/releases/deb/x86_64/Positron-2026.09.1-2-x64.debInstall it:
sudo apt install ./Positron-2026.09.1-2-x64.debLaunch Positron from the application menu.
Like RStudio, the URL above pins a specific version. Check https://positron.posit.co/download.html for the current release before downloading.
Inside Positron you can select interpreters from the top-right language menus: R sessions are provided by the R installed in Section 7.1, and Python sessions by the environment created later in this chapter. Positron bundles its own copy of the Ark R kernel, but uses your system R libraries.
Positron needs R \(\geq\) 4.2 and a supported Python. Both are covered by the installations in this chapter. See the Positron documentation on Managing Interpreters for details.
7.5 Python and the data science libraries
7.5.1 Install Python with venv support
Kubuntu ships with Python 3 preinstalled (the python3 command), but the venv module used to create isolated environments is packaged separately. So is pip, the Python package installer:
sudo apt install python3 python3-venv python3-pip python3-devUbuntu’s pip deliberately refuses to install packages system-wide (into /usr/lib/python3/...) because they would conflict with the versions that apt manages. The correct workflow is to create a virtual environment for each project and install libraries inside it with pip. This keeps every project’s dependencies isolated, exactly like R’s renv.
7.5.2 Create a project environment
mkdir -p ~/projects/ds-demo && cd ~/projects/ds-demo
python3 -m venv .venv                  # create the environment
source .venv/bin/activate              # activate it
After activation the prompt shows (.venv), and python and pip now refer to the isolated copies.
7.5.3 Install the core libraries
The standard data science stack plus spatial and machine-learning libraries:
python -m pip install --upgrade pip
python -m pip install numpy scipy pandas matplotlib seaborn \
    jupyterlab ipykernel \
    statsmodels plotly scikit-learn \
    geopandas shapely pyproj folium
What each package provides:
| Package | Purpose |
|---|---|
numpy, scipy |
Numerical arrays and scientific computing |
pandas |
Data frames (the R user’s home turf) |
matplotlib, seaborn, plotly |
Static and interactive plotting |
jupyterlab, ipykernel |
Notebooks, also used by Quarto and Positron |
statsmodels |
Statistical models and tests |
scikit-learn |
Machine learning (classification, regression, clustering) |
geopandas |
Geospatial data frames (shapefiles, GeoJSON) |
shapely, pyproj |
Geometry operations and coordinate transformations |
folium |
Interactive Leaflet maps |
geopandas works out of the box with these wheels — no system GDAL is needed anymore. If a library ever asks for system libraries (for example libgdal), install them with sudo apt install libgdal-dev gdal-bin before running pip.
7.5.4 GeoPandas example
A minimal geospatial test — plotting a world map coloured by continent area using the bundled naturalearth_lowres dataset:
import geopandas as gpd
import matplotlib.pyplot as plt

# Natural Earth countries via the geodatasets catalog
world = gpd.read_file(
    "https://naturalearth.s3.amazonaws.com/110m_cultural/ne_110m_admin_0_countries.zip"
)
europe = world[world["CONTINENT"] == "Europe"]

fig, ax = plt.subplots(figsize=(6, 5))
europe.plot(ax=ax, column="POP_EST", legend=True, cmap="viridis",
            legend_kwds={"label": "Population estimate"})
ax.set_title("Europe — population by country")
plt.show()Older tutorials use geopandas.datasets.get_path("naturalearth_lowres"), but that bundled dataset was removed in GeoPandas 1.0. Reading a remote GeoJSON or a Natural Earth file directly, as above, is the current way.
7.5.5 scikit-learn example
A classic classification example — the iris dataset:
from sklearn.datasets import load_iris
from sklearn.model_selection import train_test_split
from sklearn.ensemble import RandomForestClassifier
from sklearn.metrics import accuracy_score

X, y = load_iris(return_X_y=True)
X_train, X_test, y_train, y_test = train_test_split(
    X, y, test_size=0.3, random_state=42
)

model = RandomForestClassifier(n_estimators=100, random_state=42)
model.fit(X_train, y_train)

print(f"Accuracy: {accuracy_score(y_test, model.predict(X_test)):.2%}")A quick check that every tool is on the PATH and working together:
R --version            # R from the CRAN/Posit repository
rstudio --version      # RStudio Desktop
quarto --version       # Quarto CLI
positron --version     # Positron IDE
python --version       # inside the activated .venv
python -c "import sklearn, geopandas; print('OK')"
If all five commands succeed, your Kubuntu virtual machine is now a fully functional data science workstation.
8 Installing Docker and API Tools
The toolchain of Section 7 covers analysis and modelling. This chapter adds the final layer: the tools used to put models into production.
- Docker packages an application together with everything it needs to run — code, runtime and system libraries — into a container that behaves the same on your machine, on a server, or in the cloud.
- FastAPI is the standard Python framework for building web APIs that serve models over HTTP.
- plumber is its R counterpart: it turns annotated R functions into REST APIs.
Before starting, take a snapshot of the virtual machine (see Section 5.5) — or simply continue from the one you took in Section 7.
8.1 Docker
8.1.1 What is a container?
A container is a lightweight, isolated box for running one application. Where the virtual machine of Section 1 virtualizes an entire computer — its own kernel, its own memory — a container shares the Linux kernel of the host and only isolates the application. Containers therefore start in seconds and consume far less memory than a virtual machine.
This is also the point of the setup we have built: containers run natively on Linux, so installing them inside Kubuntu gives you the real thing.
8.1.2 Install Docker Engine
Docker Engine is not shipped by Ubuntu at current versions, so we register Docker’s official apt repository — the same pattern used for CRAN in Section 7.1:
# Remove any packages from older Docker repositories
sudo apt remove docker.io docker-doc docker-compose podman-docker containerd runc

# Install the helper tools used to manage repositories over HTTPS
sudo apt install ca-certificates curl

# Download and install the signing key used by Docker
sudo install -m 0755 -d /etc/apt/keyrings
sudo curl -fsSL https://download.docker.com/linux/ubuntu/gpg \
  -o /etc/apt/keyrings/docker.asc
sudo chmod a+r /etc/apt/keyrings/docker.asc

# Register the Docker repository
echo \
  "deb [arch=$(dpkg --print-architecture) signed-by=/etc/apt/keyrings/docker.asc] \
  https://download.docker.com/linux/ubuntu \
  $(. /etc/os-release && echo "$VERSION_CODENAME") stable" \
  | sudo tee /etc/apt/sources.list.d/docker.list > /dev/null

sudo apt update
sudo apt install docker-ce docker-ce-cli containerd.io \
  docker-buildx-plugin docker-compose-plugin
8.1.3 Add yourself to the docker group
By default, Docker commands require sudo because they talk to the system’s Docker daemon. Add your user to the docker group to run them without sudo:
sudo usermod -aG docker $USERLog out and back in (or restart the virtual machine) for the change to take effect.
Membership of the docker group grants privileges close to root’s, because Docker controls the system’s containers. On a single-user course virtual machine this is fine; on a shared server, be more careful about who joins the group.
8.2 FastAPI
FastAPI is a modern Python framework for building web APIs. It is installed with pip into the project environment created in Section 7, together with uvicorn, the web server that runs FastAPI applications, and httpx, used for testing them.
Activate your environment and install:
cd ~/projects/ds-demo
source .venv/bin/activate

python -m pip install fastapi "uvicorn[standard]" httpx
FastAPI is now available inside the environment. In a project you would write your API in a file such as main.py and run it with uvicorn main:app — the details are covered in the course exercises.
FastAPI is installed inside the virtual environment, not system-wide. It is only available while the environment is activated — the same rule that applies to every Python library in Section 7.
8.3 plumber
plumber is an R package that turns annotated R functions into REST APIs: a few special #* comments above a function define the endpoint, and plumber::plumb() runs the resulting API from inside R or RStudio.
It is installed from CRAN, like any other R package:
install.packages("plumber")As with every R package, run this from inside R or RStudio, not with apt (see the note in Section 7.1).
9 Summary
9.1 What you have achieved
You have now:
- Understood what GNU/Linux is: the GNU tools, the Linux kernel, and how distributions such as Kubuntu combine them into a complete system.
- Installed Oracle VirtualBox on Windows.
- Downloaded Kubuntu Desktop.
- Created a Kubuntu virtual machine.
- Installed Kubuntu.
- Updated the Linux system.
- Installed VirtualBox Guest Additions.
- Enabled useful integration features between Windows and Kubuntu.
- Learned how to create a snapshot.
- Taken your first steps in Plasma, Dolphin and Konsole.
- Installed a complete data science toolchain: R, RStudio, Quarto, Positron and the core Python libraries for data science, including GeoPandas and scikit-learn.
- Installed the deployment tooling: Docker Engine for containers, and the FastAPI and plumber frameworks for serving models as web APIs.
You now have a complete Kubuntu Linux environment that can be used for exercises without replacing or modifying the Windows operating system on the physical computer.
References
- The GNU Project and the free software movement — https://www.gnu.org/
- The GNU Manifesto — https://www.gnu.org/gnu/manifesto.html
- Linux and GNU — https://www.gnu.org/gnu/linux-and-gnu.html
- The Linux Kernel Archives — https://www.kernel.org/
- Oracle VirtualBox — https://www.virtualbox.org/
- Kubuntu — https://kubuntu.org/
- KDE Plasma documentation — https://docs.kde.org
- R for Ubuntu — https://cloud.r-project.org/bin/linux/ubuntu/
- RStudio Desktop — https://posit.co/download/rstudio-desktop/
- Quarto — https://quarto.org/
- Positron — https://positron.posit.co/
- Python venv — https://docs.python.org/3/library/venv.html
- scikit-learn — https://scikit-learn.org/
- GeoPandas — https://geopandas.org/
- Docker — https://www.docker.com/
- FastAPI — https://fastapi.tiangolo.com/
- plumber — https://www.rplumber.io/
- Kubuntu screenshots — Kubuntu Community, via Wikimedia Commons (GPL).
- VirtualBox screenshot — Iketsi, via Wikimedia Commons (CC BY-SA 4.0).